Installing an Ubuntu-Based Linux Distro
A practical installer walkthrough for Ubuntu 24.04-based distros: dual boot, full-disk install, manual partitioning, EFI safety checks, and first-boot handoff.
What This Guide Achieves
This guide explains the part that happens before the rest of this site: the actual Linux installation screen.
By the end, you should understand:
| Decision | What You Will Know |
|---|---|
| Install alongside Windows | How dual boot works and when to use it |
| Erase disk and install | What gets wiped and why backups matter |
| Something else | How manual partitioning works without guessing |
| EFI boot setup | Why the boot partition must be EFI/FAT32, not ext4 |
| Bootloader target | Why the parent drive matters more than a numbered partition |
| First account screen | Which login and Active Directory choices are appropriate |
This is written for Ubuntu 24.04-based distros. The tested installers were Zorin OS 18.1 Pro (screenshots below) and Linux Mint 22.3 Cinnamon (primary test OS). Some labels use Zorin wording; Ubuntu, Linux Mint, Pop!_OS, Kubuntu, and similar distros may use slightly different wording, but the disk concepts are the same. The Linux Mint installer (Ubiquity) additionally offers a checkbox for multimedia codecs on the first screen and may label partition choices slightly differently — the same three decision types still apply.
Before You Start
Do these before touching the installer:
- Back up important files from Windows or any existing OS.
- Confirm your hardware is a reasonable fit using the System Requirements guide.
- Decide whether you need Windows after the switch.
- If dual booting, free disk space from inside Windows when possible.
- Keep the laptop plugged in during installation.
- If the installer offers a “Try” mode, use it briefly to check Wi-Fi, keyboard, trackpad, display, and sound.
Warning: an installer can erase data permanently. The safe mindset is simple: if the data matters, it should already exist somewhere else before you click Install Now.
The Three Installer Choices
Most Ubuntu-based installers show three broad choices at the installation type screen.
| Installer Choice | Use It When | What It Does |
|---|---|---|
| Install alongside Windows Boot Manager | You want Windows and Linux on the same machine | Creates a dual-boot setup and lets you choose an OS at startup |
| Erase disk and install | You want the whole selected drive for Linux | Deletes the selected drive contents and installs Linux as the only OS |
| Something else | You want manual partition control | Lets you choose exact partitions, mount points, and bootloader target |
If you are unsure, do not choose Something else just because it sounds more flexible. Manual partitioning is useful, but only when you understand what each partition is supposed to do.
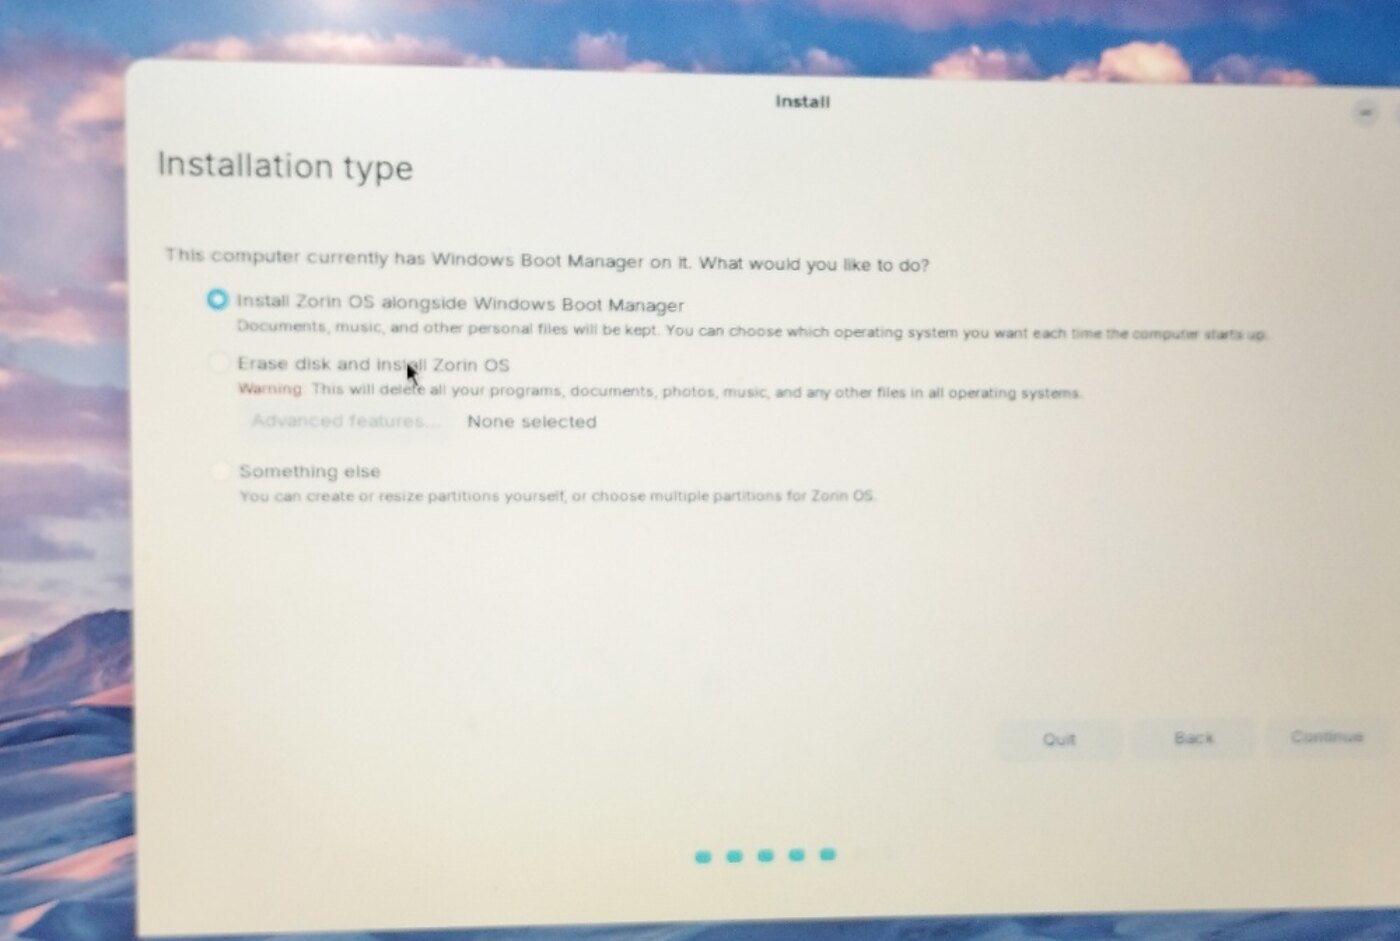
Installation type screen from the tested Zorin OS install. Other Ubuntu-based installers may use slightly different labels, but the same three decisions usually exist.
Path 1: Dual Boot With Windows
Choose this path if you still need Windows for specific software, games, work tools, or safety during the transition.
What Dual Boot Means
Dual boot means Windows and Linux live on the same drive or computer. When you turn the computer on, a boot menu lets you choose which system to start.
This does not merge the two operating systems. Windows remains Windows, Linux remains Linux, and each has its own system files.
Recommended Dual-Boot Preparation
Before starting the Linux installer:
- Back up important Windows files.
- In Windows, disable Fast Startup if it causes disk access or time-sync problems.
- Use Disk Management in Windows to shrink the Windows partition when possible.
- Leave the new space as unallocated or free space.
- Boot from the Linux USB installer.
Shrinking from inside Windows is usually safer than shrinking Windows from the Linux installer because Windows understands its own filesystem state.
If You Use the Automatic Alongside Option
If the installer offers Install alongside Windows Boot Manager, this is the beginner-friendly dual-boot path.
Use it when:
- Windows is already installed.
- The installer detects Windows correctly.
- You are comfortable letting the installer allocate Linux space.
- You do not need a custom
/homeor/datapartition.
Before clicking through, read the size slider carefully. Make sure both Windows and Linux get enough space for your real use.
If You Use Something Else for Dual Boot
Use Something else for dual boot only when:
- the automatic alongside option does not appear
- you already prepared free space
- you have multiple drives
- you want exact control over the Linux partition
In the partition list, look for real free space. Do not select the tiny 1 MB free space entry that sometimes appears for disk alignment. That small gap is normal and is not usable installation space.
For a simple dual-boot install, create one Linux root partition in the large free space:
| Setting | Value |
|---|---|
| Size | Use the prepared free space, or at least 40 GB |
| Type | Primary |
| Location | Beginning of this space |
| Use as | Ext4 journaling file system |
| Mount point | / |
Leave the existing Windows EFI System Partition alone. Do not format Windows partitions unless you intentionally want to destroy that Windows install.
Dual-Boot Bootloader Target
At the bottom of the installer, the Device for boot loader installation should normally be the parent drive:
/dev/nvme0n1or:
/dev/sdaDo not choose a numbered partition such as:
/dev/nvme0n1p1or:
/dev/sda3On a normal single-drive setup, the installer should find the EFI System Partition and add Linux boot files there.
Path 2: Full-Disk Linux Install
Choose this path if you are done with Windows on that drive and want the computer to become a dedicated Linux machine.
Automatic Full-Disk Install
The simplest full-disk path is Erase disk and install.
Use it when:
- you want Linux to use the whole selected drive
- you have already backed up important data
- you do not need custom partition layout
- you want the installer to make the boot and system partitions automatically
Warning: this option wipes the selected drive. It removes Windows, installed programs, and personal files from that drive.
Some Ubuntu-based installers offer Advanced features for options such as disk encryption or LVM. Use encryption only if you are prepared to protect the passphrase carefully. If you lose the encryption passphrase, recovery is usually not realistic.
Manual Full-Disk Install
Use Something else for full-disk installation when you want a thoughtful layout instead of one automatic system partition.
This makes sense if you want:
- a separate
/homepartition - a separate data partition
- clearer separation between system files and project files
- easier reinstall planning later
The tested setup used this style: an EFI partition, a root partition, a home partition, and a dedicated data partition.
Manual Partition Example for a 512 GB SSD
This layout is a practical starting point for a clean single-OS Linux machine with one 512 GB SSD.
| Partition | Size | Use As | Mount Point | Purpose |
|---|---|---|---|---|
| EFI System Partition | 512 MB | EFI System Partition | Usually handled by installer | Boot files for UEFI firmware |
| Root | 100-180 GB | Ext4 journaling file system | / | Linux system and installed apps |
| Home | 100-160 GB | Ext4 journaling file system | /home | user settings, browser profiles, default folders |
| Data | Remaining space | Ext4 journaling file system | /data | datasets, projects, archives, media, large files |
For most readers, /data is the clearest name for the dedicated storage partition.
The tested author setup used a custom data mount path such as /mmh. That is fine for a personal workstation, but /data is easier to understand and document for general users.
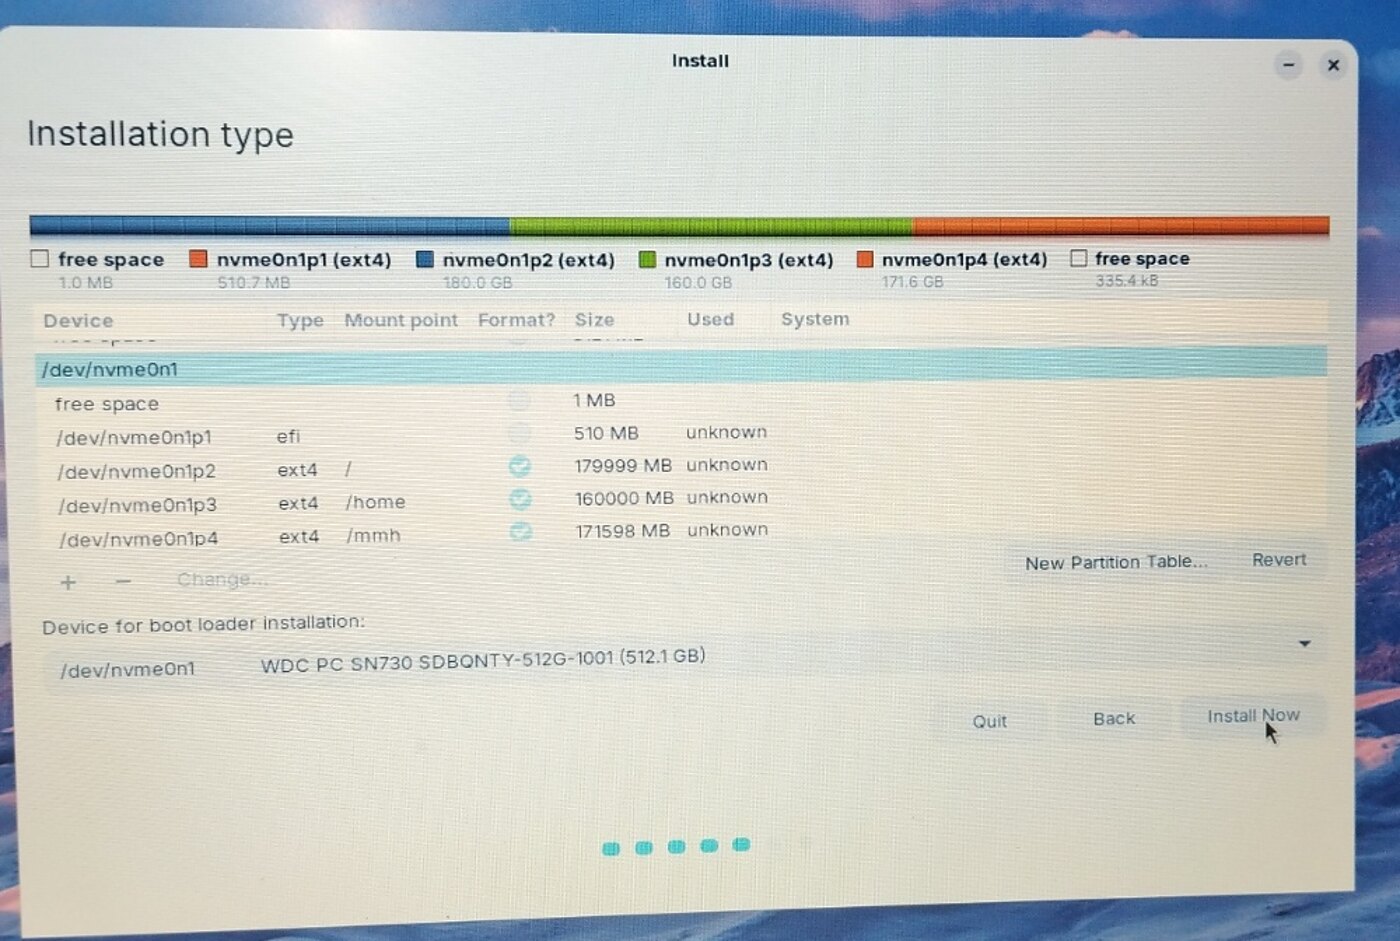
Manual partition layout from the tested full-disk install after a clean SSD wipe. The key details are the EFI partition, root /, /home, dedicated data partition, and bootloader target set to the parent drive.
EFI Partition
Create this first:
| Setting | Value |
|---|---|
| Size | 512 MB |
| Type | Primary |
| Location | Beginning of this space |
| Use as | EFI System Partition |
The EFI partition must be an EFI System Partition. It should not be ext4.
If the top visual disk bar still shows the EFI partition as ext4 after you changed it, delete only that small partition and recreate it as EFI System Partition. This avoids wasting time on an install that may fail at the bootloader step.
Root Partition
Create the root partition next:
| Setting | Value |
|---|---|
| Size | 100000 MB to 180000 MB |
| Type | Primary |
| Location | Beginning of this space |
| Use as | Ext4 journaling file system |
| Mount point | / |
Use the larger end of the range if you plan to install heavy development tools, research software, LaTeX, Docker, large IDEs, or many desktop apps.
Home Partition
Create /home after root:
| Setting | Value |
|---|---|
| Size | 100000 MB to 160000 MB |
| Type | Primary |
| Location | Beginning of this space |
| Use as | Ext4 journaling file system |
| Mount point | /home |
This stores user settings and normal user folders. It is not a backup by itself, but it can make future reinstalls cleaner if you know what you are doing.
Data Partition
Use the remaining space for data:
| Setting | Value |
|---|---|
| Size | Remaining space |
| Type | Primary |
| Location | Beginning of this space |
| Use as | Ext4 journaling file system |
| Mount point | /data |
Use this for large project folders, datasets, media, archives, and files you want clearly separated from system and application settings.
Final Safety Check Before Install Now
Before clicking Install Now, check these items slowly.
Check 1: EFI Is Really EFI
The boot partition should be labeled as EFI System Partition, ESP, or FAT32 depending on the installer view.
It should not show as ext4.
Check 2: Root Has /
Your Linux system partition must have:
Mount point: /Without /, the installer has nowhere to install the operating system.
Check 3: Bootloader Target Is the Parent Drive
For an NVMe SSD, choose something like:
/dev/nvme0n1For a SATA SSD or HDD, choose something like:
/dev/sdaAvoid numbered partitions such as /dev/nvme0n1p1 or /dev/sda3.
Check 4: Write-to-Disk Summary Is Correct
After clicking Install Now, the installer shows a final summary before writing changes.
Confirm it only formats the intended Linux partitions:
- the new EFI partition, if this is a full-disk install
- the new
/root partition - the new
/homepartition, if you created one - the new
/datapartition, if you created one
For dual boot, make sure it is not formatting your Windows NTFS partition unless you intentionally chose to erase Windows.
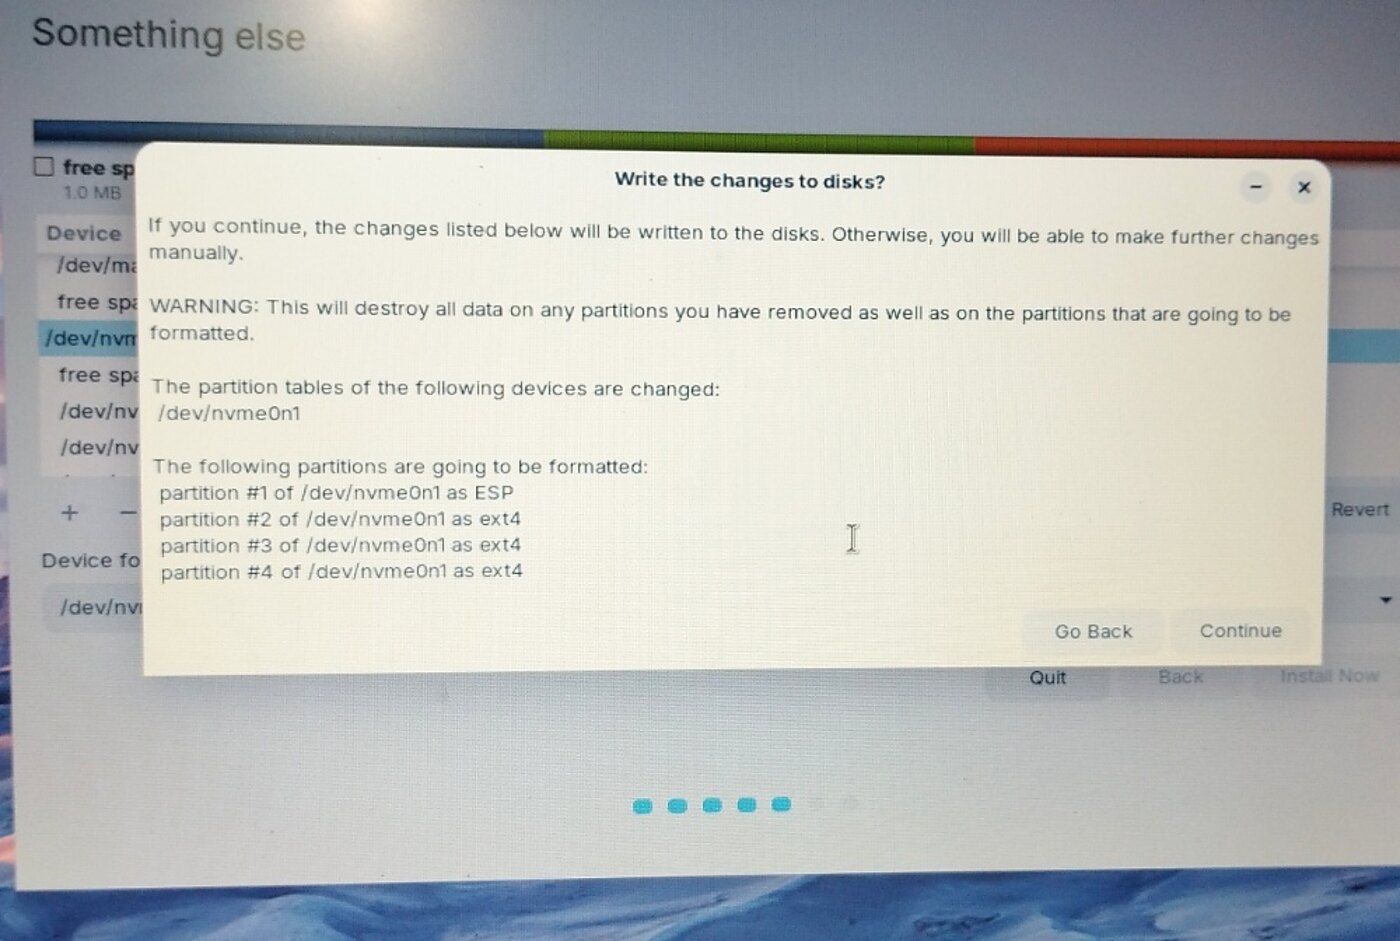
Final write-to-disk confirmation from the tested install. This is the last checkpoint before the installer writes partition changes permanently.
Account Screen Choices
After disk setup, the installer asks for user information.
Your Name
This can be your display name. It may contain spaces.
Example:
Md. Mohsin HossainComputer Name
Use a simple lowercase name with letters, numbers, and hyphens.
Examples:
mohsin-thinkpad
research-laptop
linux-workstation
Username
Keep this short and lowercase. Avoid spaces.
Examples:
mohsin
admin
research
Your username becomes part of your home path:
/home/mohsinPassword Choice
For a personal laptop, choose Require my password to log in.
Automatic login is convenient but weaker. If the laptop is lost or someone opens it, your files and browser sessions are easier to access.
Active Directory
Leave Use Active Directory unchecked unless an organization, university, or company IT department explicitly told you to join their domain.
Active Directory is for centralized organizational login management. A normal personal laptop does not need it during installation.
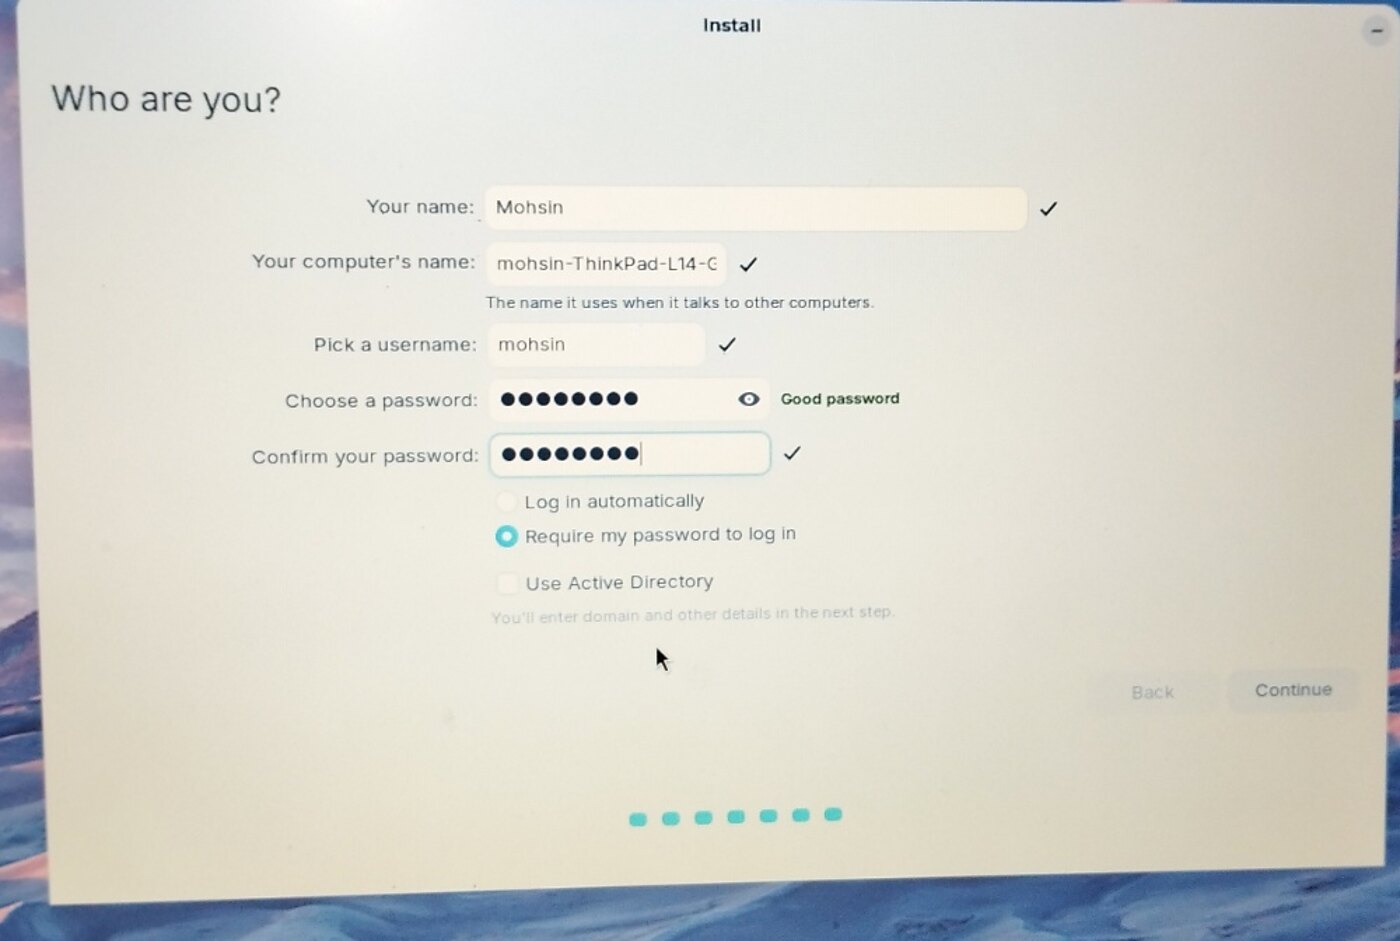
Account setup screen from the tested install. For a personal laptop, requiring a password and leaving Active Directory unchecked is the normal choice.
After Installation Finishes
When the installer completes:
- Restart when prompted.
- Remove the USB installer when the system asks or when the machine begins rebooting.
- Boot into the installed Linux system.
- Run the First Boot Checklist.
Do not rush into installing every app immediately. First confirm updates, drivers, display server choice, and backups.
What This Guide Does Not Repeat
To keep this guide focused, these topics are handled elsewhere:
| Topic | Use This Guide |
|---|---|
| Hardware fit and tested laptop details | System Requirements |
| First update, missing folders, essential tools | First Boot Checklist |
| X11 vs Wayland after install | Display Server Guide |
| System snapshots and external backup | Timeshift Full Backup |
| Stata setup after Linux is installed | Stata 19 MP Complete Guide |
Official References
Related Guides
- Choosing a Linux Distro - decide what to install before opening the installer
- System Requirements - check hardware and storage expectations
- First Boot Checklist - what to do immediately after installation
- Timeshift Full Backup - create recovery snapshots before major changes
Discussion